Compatibility overview
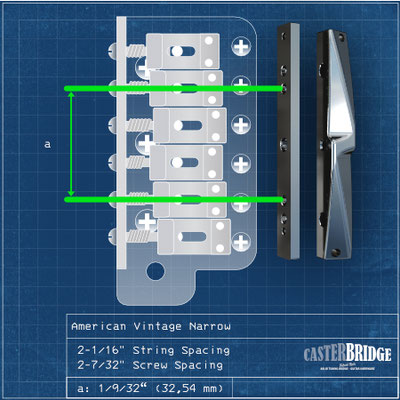
ST-Model


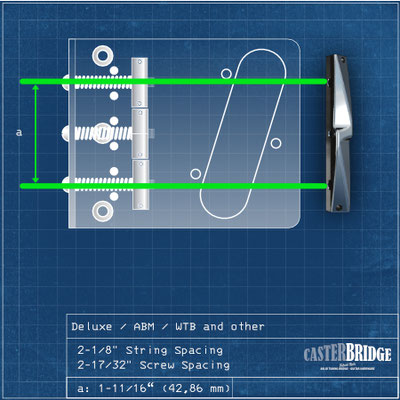
T-Model


Entire
overview

Assembly instructions for the CASTERBRIDGE
The CASTERBRIDGE® was designed for „string-through-body“ guitars
( For guitars with a top loader bridge, small notches should be made in the CASTERBRIDGE )
We recommend having the CASTERBRIDGE installed by a specialist or
guitar builder! Special knowledge is required for the fine adjustment of the neck inclination and intonation of the strings.The instrument must be properly processed. The neck position and the
position of the bridge hardware must be well matched so that the strings run straight on the fretboard.
ST model and T model with 6
saddle
Bridge
• remove all three or six saddles from the base plate of the original hardware
• keep the saddles in a safe place
• clean the base plate with a clean cloth
• take the CASTERBRIDGE out of the box
• remove the screws (1) and (2) with springs and from the flat central part of the CASTERBRIDGE
• place the CASTERBRIDGE in the middle of the tremolo or hardtail base plate
• put the screw (1) through the A-string hole and screw (2) through the B-string hole
• insert the short springs and over the screws (1) and (2)
• spin the screw (1) and screw (2) into the equally spaced threaded hole in the intermediate part of the CASTERBRIDGE
• Always tighten the screws alternately until you can see the holes of the string holes in the base plate between the CASTERBRIDGE and the intermediate part
• put on the low E-string and tune the string to note "E"
• adjust the height of the CASTERBRIDGE with the grub screw until the string can vibrate freely
• now strike the octave of "E" in the 12th Tap.
• If the tone displayed on the tuner (12th Tap) is too low, you must move the CASTERBRIDGE in the direction of the pickup ( turn the screw (1) anti-clockwise to do this )
• If the tone displayed on the tuner in the 12th Tap position is too high, you must move the CASTERBRIDGE in the direction away from the pickups (turn the screw (1) clockwise
to do this until the open string "E" and the octave tone is in the 12th Tap position match exactly on the tuner
• After the low E-string, now pull on the thin E-string and carry out the same settings as for the low E-string
• now the remaining four strings can be opened and tuned
• Make sure that the strings are aligned at equal distances to each other on the CASTERBRIDGE while tightening
• If necessary, adjust the CASTERBRIDGE with the grub screw until the desired string position is reached.
Telecaster with three saddle Bridge
• remove all strings from the guitar
• remove all three lugs from the base plate of the original hardware
• keep the bucks in a safe place
• clean the base plate with a clean cloth
• Take the pre-assembled CASTERBRIDGE out of the packaging
• remove all screws and springs as well as the intermediate part from the CASTERBRIDGE
• Take the parts from the small accessories bag out of the packaging
• insert one of the three long screws through the middle hole of the guitar's original base plate
• slide one of the three long springs over this screw and fix the screw in the threaded hole on the CASTERBRIDGE ( turn the screw only a few turns into the thread at the
beginning )
• Now insert the two remaining longer screws through the outer holes of the guitar original hardware and push the springs over the screws
• now tighten the middle screw until the screws protrude a few millimeters out of the CASTERBRIDGE.
• Now the outer screws can always be moved into position alternately and evenly until the CASTERBRIDGE has reached the position of the holes for the string passages in the base
plate. A few millimeters of space should be left between the holes in the strings and the CASTERBRIDGE.
• Now fix the two outer long screws with the M3 nuts from the accessories bag
• the middle screw should not be removed as an additional fixation of the CASTERBRIDGE
• put on the low E-string and tune the string to note "E"
• adjust the height of the CASTERBRIDGE with the grub screw until the tone of the string can vibrate freely
• now strike the octave of "E" in 12th Tap position
• If the tone displayed on the tuner (12th Tapposition) is too low, you must move the CASTERBRIDGE in the direction of the pickups (to do
this, loosen the nut a little and turn the screw counter-clockwise until the open string "E" and octave tone are in the 12th Tap position).
location exactly match the tuner)
• now you can tighten the M3 nut again
• If the tone displayed on the tuner in the 12th Tap position is too high, you have to move the CASTERBRIDGE in the direction away from
the pickups (turn the screw clockwise to do this until the open E-string and the octave tone
in the 12th Tap position match exactly on the tuner and fix the screw with the M3 nut
• After the low E-string, now pull on the thin E-string and carry out the same settings as for the low E-string bevore
• now the remaining four strings can be opened and tuned
• Make sure that the strings are aligned at equal distances to each other on the CASTERBRIDGE while tightening
• If necessary, adjust the CASTERBRIDGE with the grub screw until the desired string position is reached
Note :
-If the spacing of the strings to each other is very wide or very narrow across the fingerboard, small notches can be filed into the CASTERBRIDGE to adjust the string spacing to the fingerboard. The notches will not rust because the CASTERBRIDGE is made entirely of brass.
- if the strings distance
too far from the fretboard after installing the CASTERBRIDGE, you must readjust the neck angle as follows:
• Check that you have the correct hex socket wrench for the small height adjustment screw in the neck mounting plate ( note the graphic below! )
• Check if you can move the screw under the neck mounting plate
• if you can move the screw under the neck cover plate, screw it clockwise until you can't turn it any further (don't use too much force to avoid damaging the
thread!)
• If the distance of the strings is still too high, loosen the two lower screws at the end of the neck by about half a turn
• then turn the small screw for adjusting the height of the neck clockwise until the strings have reached the optimum height
• now you can tighten the two larger collar screws evenly again
• If your guitar doesn't have a screw under the neck plate, you can also use two flat washers to improve the angle of the neck
• To do this, detach the neck from the body of the guitar and place the washers between the neck and the body where the screw holes are (use the screws that fix the end of the
neck for this).
• If the distance is still too high, add two more washers between the neck and body.
• If the distance of the strings is too low even with the grub screws fully unscrewed and the strings rest on the fingerboard, you can use the longer grub screws (M3) from the
accessories bag.


